As I reflect upon the various topics that were explored throughout this semester, it’s so neat to think about how my thinking has developed and changed. I thought putting together a visual representation would be the best way from to display some of my learning. I loved using Piktochart to create an infographic last week so deciding how I wanted to present my thoughts this week was an easy choice! It was definitely one of my favorite tech resource discoveries because I know it will be an engaging tool and the classroom applications are endless! This class has really opened my eyes to the benefits of making in the classroom. I love that students get to take the lead and work together to solve problems. Not only does making encourage problem solving and learning, but it also supports the character education work we do at our school. I have really enjoyed this class and it has inspired me to think about technology in the classroom in new and exciting ways!
Assessing creativity and the ideas that students bring to their work can be a delicate process. Or at least I thought so. The articles that were presented to me this week made me wonder if a bit more honesty would actually help my students grow more as thinkers and creators.
As I read through the Wiggin’s blog post on assessing creativity, I was pretty entertained, honestly. I enjoyed his direct approach to presenting ideas. His thought that we may be doing a disservice to our students if we are sugar-coating our feedback resonated with me. In the article, he discusses his experience with a group of ELA teachers and their reluctance to assess student writing with an engaging-boring scale. (I definitely can relate to their initial struggle with this idea.) He brings up that, as teachers, we assess so many things and to not be honest with our students when we talk about how engaging, or not engaging, their writing is will actually hold them back from becoming stronger writers. The creativity they bring to their writing and their other work is important and we should communicate that to our students.
In the video, Grading with Games, James Paul Gee stated that the type of education that we encourage currently, one that “privileges people who know a lot of facts, but can’t solve problems”, is a thing of the past, and if our students are to be successful later on they need to be innovators and problem-solvers. (Gee, 2010) So how do we get them there?
Gee also discusses how video games are constantly assessing the player, and that the constant feedback helps to guide the player and they are learning and growing more as a result. This constant feedback throughout a learning experience is so critical to student learning. Whether it be from a teacher or from other students, it should be a part of the learning experiences we are designing for our students.
As we give feedback and observe our students’ successes and failures throughout an experience, we can change the experience to fit their needs. This information also helps us to make changes for the next time we teach that concept or try that type of activity again.
A very important part of the assessment process is to allow students the space to do their own self-assessments. This would allow the students to think about their performance and take the necessary time to learn from the process.
Some possible questions on a self-assessment might be:
Did I persevere? In what ways?
What challenged me? What was easy for me?
How does my creation connect to our learning in class?
Who did I collaborate with?
Did I accept or reject their ideas? Did I do so respectfully?
Did I show integrity through the process?
Could I improve or change my creation?
How did this experience help me understand the concepts?
How was I creative?
What am I most proud of?
These types of self-assessment questions could be a great way to start conversations about their ability to work as a collaborator and also to start talking about their creative thinking. I would want to present this assessment to my students before a learning experience begins so that they are reminded of the expectations I have for them and they can consciously make an effort to fulfill those expectations. They will then be prepared to fill out that self-assessment at the end of the experience. These self-assessments will also be a great way to encourage honest individual or small-group meetings.
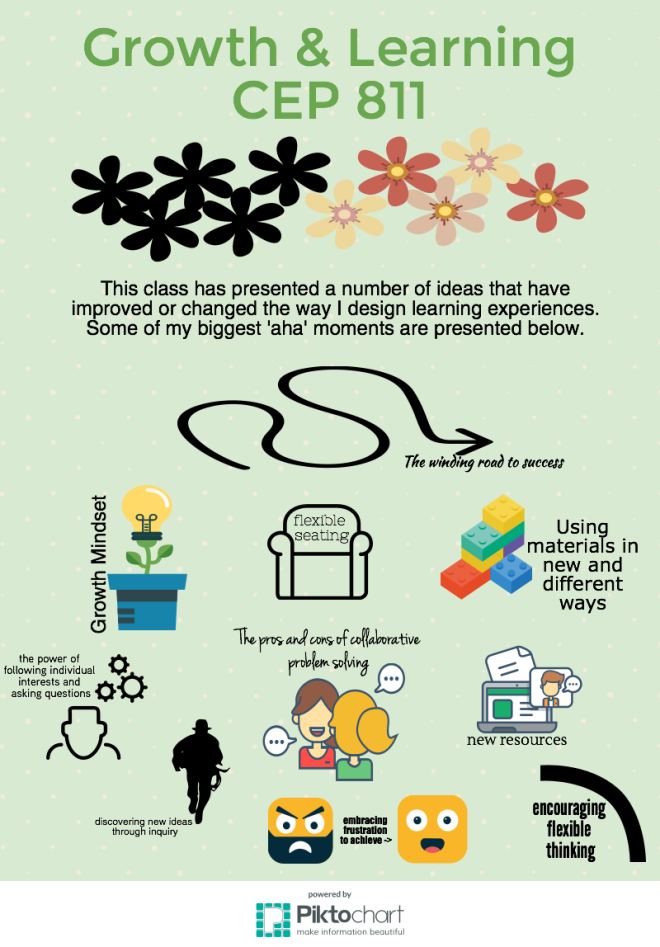
This week in CEP 811 was a favorite of mine. We spent time exploring infographics and I was SO inspired as I was working through a fun infographic of the process of making. I couldn’t stop thinking of how this tool could be used in a million different ways in the classroom. As an added bonus, it was really fun to make! I enjoyed exploring the graphic that Piktochart had to offer and I was able to find symbols that represented each of the steps I outlined on my map. I love that they offer so many graphics for the kids to choose from and it ties in very nicely with a visible thinking activity that many teachers struggle with called Color-Symbol-Image. I can see this being a tool that could open up some doors for us with that powerful routine. I can’t wait to use this for retelling in Language Arts, life cycles in Science, and to represent the steps my mathematicians use to solve problems! As I move up a grade level next year, I am really excited to see how the kids take on this new program. I have a strong feeling that they are going to love it and this will be a highly requested project/tool throughout the year!
I was playing around with the features of Piktochart and I ended up creating the infographic that is featured below. I was thinking about the steps that I took while working on some of the projects in this class and I tried to represent the process with images and text. I liked the road map template that the site offered as I felt it fit the idea that making is a journey.
While reading Halverson’s article entitled, The Maker Movement in Education, I thought it did a nice job of introducing what this whole movement is about. I have found that many of the teachers in my school haven’t heard much about the maker movement, so I thought I would take the basic ideas from the article and put them into an infographic. I also included a few of the things the maker movement can create because I feel that it could be a motivating factor for teachers who are on the fence about the maker movement to see what some of the benefits are!
References:
Halverson, E.R. & Sheridan, K. (2014). The maker movement in education. Harvard Educational Review, 84(4), 495-465.
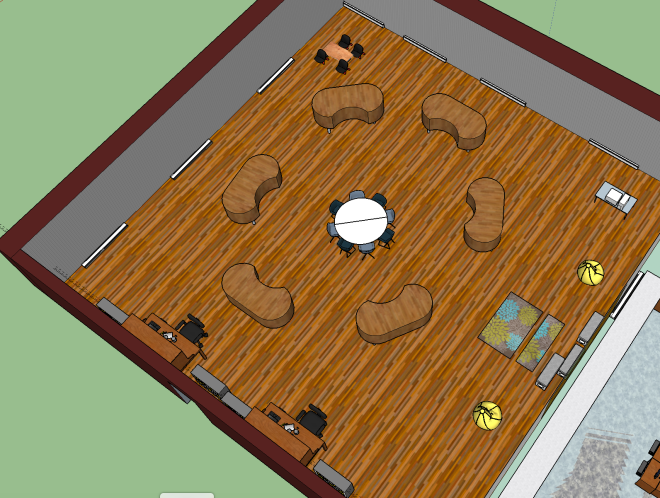
I was excited to see that this week’s assignment was focused on designing our classroom spaces to encourage and support the learning goals we set for our students. This has been a topic that always catches my eye while I read through educational blogs. I am always curious to see how other teachers have organized their space and I am constantly thinking about how I could change my room around to benefit my students. My room is organized in what I would say is a pretty typical fashion. The desks in my room are pretty large so they take up most of the space in my room. I group them together in pods so it is easier for the children to work together. I have floor space available for whole-group instruction and I also allow my students to sit on the floor whenever they choose. The other seating options in my room include stools, camp chairs, rocking chairs, movable cubes, and large pillows. I have read a lot of blogs and articles that advocate for flexible seating options for students. I try to allow them to choose where they sit for most of the day, but that also brings up a lot of management questions for me. There are the students who will always try to take the “cool” seats or rush to the rocking chairs first. This leaves my more reserved students not getting the opportunity to sit where they would really like. I have done a number of things to solve this problem, but then I hesitate to over-manage the seating because it seems like that defeats the purpose of allowing for flexible seating. Another issue I have with the layout of my room is that it is all directed to the front of the room which puts the focus on the teacher and minimizes the importance of student-directed learning and group learning. You can get an idea of what my room looks like right now from the pictures below.
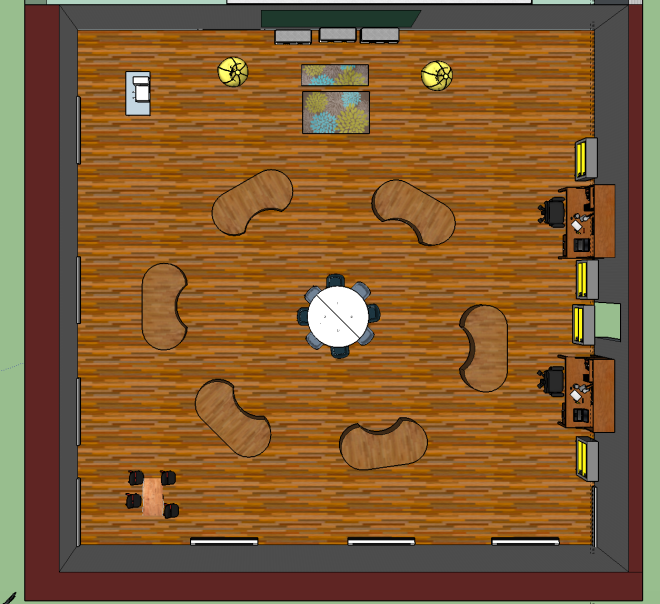
Now, when I think about an alternative layout for my room (see the SketchUp design posted below), I want someone to walk in and not know where the front of the class is. I like the idea of having a central table that I can pull students to or that they would have the option of moving to on their own to collaborate with others. Some of my students have a really difficult time sitting at a table with others all the time so to give them a space to work independently without having to go out in the hall or be sent to a table in the very back of the room, I have included two desks at the side of the room that would provide some privacy. I chose to use kidney bean tables because the rounded edges give a more flexible feel to the table and students could sit at any part of the table and be comfortable. Ideally, I would have rolling chairs to allow for easy movement at a table and around the room. I also like that all of the tables are situated so that the kids could all be sitting down and still be able to see everyone in the class. It would send the message that every voice is important, not just mine! This layout would promote whole-class collaborative learning in a way that just isn’t possible with my current layout. (Check out one of my previous posts about the benefits of collaborative learning!)
There are a number of other seating options available including a rug, benches by the Smart Board, bean bags, and chairs at a back table. You may have noticed in the pictures of my actual classroom that I love having bright colors in my classroom. I have been hearing about more research that supports the need for more soothing colors and areas of the room that provide visual rest. The color scheme in the room below has taken the soothing colors and visual rest a bit too far back into the 70’s for me, but I do think that offering a space that is simple, plain, and soothing for students to relax in would be a great addition to my room. Many of these items may be available already in the district warehouse, but if they are not available, the different tables and rolling chairs would be very costly. The benches could be handmade over the summer and the bean bags could be bought for about $20 each. I would have to run the seating arrangement by my principal and get the new furniture approved and providing the parents with a rationale for this unique setting would be important. The switching out of my desks for the tables would have to wait until the summer when the custodians clean and switch out the furniture. The other seating options could be implemented immediately.
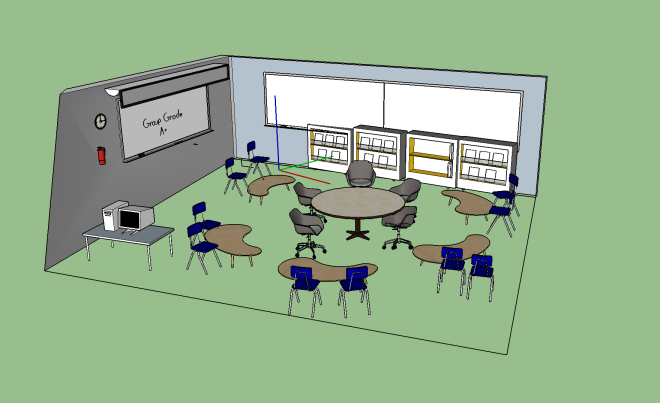
The picture below is an alternate view (and one of my earlier designs).
Tech Note: This is such a cool tool! I was just chatting with a student about how she really wants to be an architect when she grows up and then I discover SketchUp- it’s just too perfect. While this is not something that she could start working on alone right now, it could be an awesome thing to do with mom and dad! I also love that, with a bit more practice, I can use this to create possible designs for the renovation projects I’m planning for my new house.
Gu, X. g., Chen, S., Zhu, W., & Lin, L. (2015). An intervention framework designed to develop the collaborative problem-solving skills of primary school students. Educational Technology Research & Development, 63(1), 143-159.
This week, we were asked to create a lesson plan that would provide our students the opportunity to create and explore. After researching collaborative problem solving, I decided that this activity would be most beneficial if the students were able to work together and discuss their findings as they work.
2nd Grade Science: Sound – Pitch vs. Volume
Standards:
S.RS.00.11 Demonstrate scientific concepts through various illustrations, performances, models, exhibits, and activities.
S.IA.00.12 Share ideas about science through purposeful conversation.
S.IA.00.13 Communicate and present findings of observations.
CCSS.ELA-LITERACY.SL.2.5Create audio recordings of stories or poems; add drawings or other visual displays to stories or recounts of experiences when appropriate to clarify ideas, thoughts, and feelings.
Big Ideas:
Students will be able to independently use their learning to…
-Explain the various pitches that their instrument makes
-Explain the difference between volume and pitch
-Identify evidence that supports their thinking
Essential Questions:
How did creating your own instrument help you to better understand pitch?
How did creating your own instrument help you to better understand volume?
How did interacting with the instruments other students made help you to better understand pitch and volume?
How can working collaboratively with your peers help you to develop a deeper understanding of a topic?
Lesson Time: One Hour
Materials:
-Makey Makey makers kit
-Laptops
-A variety of conductive items (Ex: paperclips, marshmallows or other metallic items)
-The teacher may decide to include non-conductive items as well so the students have a chance to explore.
* EDUCREATIONS TIPS: It is helpful to have all iPads logged into the correct Educreations account before beginning the creation process. If you don’t have a class account set up, you can always use one account on all of the iPads. Keep in mind, that doing it this way prevents the saving of drafts as the kids work so they need to rehearse before they record. Educreations videos are easy to quickly send to the students’ parents and they get rave reviews.
The students were given time to explore the concepts of pitch and volume during various experiments and activities. They have also spent the year working on understanding how to work collaboratively and respectfully with one another. These skills are reinforced and there is an expectation that they complete their tasks as professional scientists.
Procedure:
Minutes 0-15
Engage students by playing banana bongos using the app on the Makey Makey website. Check out the video below if you want a little sampling of what the kids will see!
2. Inform the students that they will be creating their own digital instrument to use as they explore volume and pitch. They will use the
3. Explain the basics of the Makey Makey kits
Introduce each of the parts of the kit
Remind students of the expectation that they will be positive digital citizens throughout this activity.
Take the students step by step through clipping the alligator clips to the board & connecting the board to the computer. The Makey Makey quick start guide (click below to visit the full site) may be a helpful resource for the teacher to display as she is explaining the steps.
Students will then create their instruments using the provided materials in their science discovery groups.
Minutes 16-30
Students spend this time exploring and discussing the various sounds they can create with their instrument.
They will discuss their findings as a group throughout this time.
Display the following guiding tasks to help
keep their conversations on topic:
-Play a low pitch sound
-Play a high pitch sound
-How can you change the volume of the sound?
-Does changing the volume also change the pitch?
*Teacher should be visiting each group frequently during this time.
Minutes 31-45
Instruct students to spend five minutes collecting their thoughts and discussing their findings with their groups. We call this “Prepare to Share” time.
Invite students to carpet for a whole group discussion.
Discuss the findings the students came upon. Identify and clear misunderstandings.
Invite students to demonstrate as they describe their findings.
Minutes 46-60
Students rehearse and record their explanations using Educreations.
Video Requirements:
Identify a high pitch sound
Identify a low pitch sound
Change the volume of one of the sounds
Answer the question: Does changing the volume also change the pitch?
Bonus: Play a fun song for the audience!
Have students save their videos with the title “NAME Sound”
Ask for a few student volunteers to share their work.
Extension: Use the Makey Makey instruments to create a class wide band before you have the kids clean up! This could be a good transition into discussions about how sound can be helpful, pleasant, unpleasant, or harmful!
Evaluate:
Formative:
The students will have learned the basics of these concepts prior to working with the Makey Makey kits. During this time, the teacher will monitor their work during experiments and also the written work they complete in their science notebooks. The teacher will listen in to conversations that the groups are having during their Makey Makey instrument exploration to decide if guiding questions or re-teaching is necessary.
Summative:
Their final grade will be determined by the Educreations video they create. I expect that the students will provide an example of them using the Makey Makey instrument to show examples of a low pitch sound, high pitch sound, and how to change the volume. They should be able to explain that the volume of a sound can change without the pitch changing.
Rationale:
The sound concepts of pitch and volume can be extremely difficult to explain effectively which makes a hands-on approach a necessity. The activities leading up to this final activity were strongly rooted in inquiry-based learning techniques along with direct instruction to help reinforce and focus their discoveries. While researching collaborative learning, I was interested to discover that there are differences in the effectiveness of group work as a tool for encouraging academic growth for different kids based on their achievement (Sears, 2013). Low and average academic performers benefit academically from the discussion and being able to take in other ideas that they had not previously thought of. For this reason, it was most appropriate to assign this assignment to groups rather than to individuals. Beyond the academic benefits, the ability to collaborate and work with others will help them to figure out how the technology works and they can work together to solve any problems that arise. As I stated in my previous post, one piece of research found that higher achieving students do not experience the same academic benefit from collaborative learning (Sears, 2013). While this is a thought-provoking statement, I wouldn’t take the experience of working with others away from any of my students. Being able to work collaboratively and putting these children in a situation in which they need to explain their thinking and interact respectfully even when they think they are right is critical to their future success and students and people. For these reasons, I believe that creating the opportunity for all students to explore and discuss their findings is a crucial part of the discovery process and will be beneficial to all students whether it is an academic benefit or social benefit.
References
Sears, D. d., & Reagin, J. (2013). Individual versus collaborative problem solving: divergent outcomes depending on task complexity. Instructional Science, 41(6), 1153-1172.
Many of the staff meetings and professional developments sessions I have attended this year have focused on collaborative and inquiry based learning. One of the criticisms that some of the teachers have brought up was also echoed in the literature review section of the article, An Intervention Framework Designed to Develop the Collaborative Problem-Solving Skills of Primary School Students. The article states,“Scholars have also discussed challenges of collaborative learning, including, for instance, it is often off-task, uncooperative, arbitrary, and of little educational value.” (Gu et al., 2015, p. 145). While I do agree that at times, managing collaborative talk and work can be exhausting and it can be tempting to skip the whole process and just do it the old fashioned way, the benefits of collaborative learning definitely outweigh the stress of the management. The study outlined in the aforementioned article focused on the role of teacher intervention in collaborative work and the skills that students need in order for the collaborative work to be successful. The study found that the “students gained mainly through the intervention of ‘‘setting up rules for discourse’’ and the strategy of ‘‘question prompts”” (Gu et al., 2015, p. 156). From this study we can see that in order for the collaborative work we plan for our students to be successful, we need to model and help our students understand the expectations for working in collaborative groups. These collaborative skills should be taught from day one in classrooms and be a daily expectation in the classroom community. Once we have the classroom community and expectations in place, the academic value of collaborative problem solving can begin to emerge. Although, the academic value of collaboration for all students isn’t a topic that is completely agreed upon.
One of the most interesting findings that I read about came from the Sears’ research on individual versus collaborative problem solving. The researchers found that, “..for students who were able to solve the problem successfully alone, collaboration was more of a hindrance than a benefit to performance.” (Sears, 2013, p. 1167). Now, this raises interesting questions for us as educators. Is collaborative learning always the best choice for our students? Is is actually a positive thing for our high achieving students to experience this disequilibrium and learn how to adapt and struggle? When I think about this last question, I think back to getting math help from my brilliant older brother when I was much younger. I never wanted to ask for his help because he was so brilliant that he had actually reached a place in his learning that it had become difficult for him to remember the steps that had become automatic for him. Breaking a math problem down to my novice level was extremely difficult for him and, back then, teaching students to explain their thinking wasn’t as much of a focus. This idea that the collaborative work could be a great way to challenge our high achieving students to break down their thinking processes in order to successfully communicate is very intriguing to me. The findings of that same research also state that the average to low performing students performed better when collaborating with others (Sears, 2103). Using this research of an activity based on collaborative problem solving, what we see is that all students benefit in some way from collaborative work. It is a way to challenge our students to see beyond their own ideas and be flexible with their ideas and learning.
The maker movement fits perfectly into this discussion of collaborative problem solving. Maker Education exemplifies the whole premise that students should be working collaboratively to create something new, persevere through challenges, and develop perspective-taking skills. The quote stated earlier in this paper regarding the challenges of collaborative learning reminds me of the struggles that Richard Culatta’s TED talk about the ‘digital divide’ outlines. He discusses how so many teachers are falling into the trap of replacing the traditional way of teaching with a piece of technology rather than using the available technology to do something otherwise impossible (Culatta, 2013). Being an educator can be taxing and thankless at times, but we all decided to be educators because we love to create lessons for our students and see our students succeed. Collaborative problem solving and maker education are risks we can take as educators to see our students succeed and be motivated in a whole new way.
As we think about the benefits of collaborative work and its positive impact on problem solving skills, it is clear that giving students the opportunity to be makers certainly provides them a space to develop these skills and interests. Of course, we think about time and how we would integrate these types of activities into our classroom schedules. The question that this dilemma raises for me is, “Can we afford not to find the time for our students?” The new superintendent in my district encouraged us at the beginning of the year to ‘give something up’ to allow for the introduction of something new and great. To me, the collaborative problem solving and maker education are worthy of being the new and great things that I bring to my classroom!
References:
Sears, D. d., & Reagin, J. (2013). Individual versus collaborative problem solving: divergent outcomes depending on task complexity. Instructional Science, 41(6), 1153-1172.
Gu, X. g., Chen, S., Zhu, W., & Lin, L. (2015). An intervention framework designed to develop the collaborative problem-solving skills of primary school students. Educational Technology Research & Development, 63(1), 143-159.
One of the first things I tried with the Makey Makey kit was the “Banana Bongo” activity that is outlined in the setup guide included in the package. It took a few minutes to get going, but as soon as everything was hooked up, it was a hoot to play with! Even my fiance wanted to get in on the fun (although our puppy was not amused!!)! You can view the musically stylings of my fiance in the (grainy) video below!
I then went on to explore with a bunch of different items I had laying around my house. It was fun to explore the various possibilities and the fact that bananas worked made me stretch myself to try other unusual objects before ruling them out. The fact that this kit made me start questioning and thinking in new ways from the moment I started playing with it really got me interested. I can see my students really getting into this and discovering so much without any input from me!
Here are some of my failed attempts:
After a few tries, and a visit to my home office, I found some materials that worked.
Of course, the first connection I made regarding the kit and elementary curriculum was the unit our 4th grade science teacher teaches on electricity & circuits. We are focusing on including inquiry-based instruction when it is appropriate and I can see the students discovering some of the concepts on their own in order to make this circuit work. At our school we also try to allow time for our students to work on coding. Using the MM kit with the site Scratch is such a neat way to get the kids engaged with coding in a whole new way. As I played with the kit more I realized the value of this maker kit goes beyond the obvious. As a 2nd grade teacher, I teach the students about sound. The Makey Makey site has different instruments that can be controlled using this kits. I can see my students creating a really cool digital band in the computer lab with these kits and applying the vocabulary and concepts they have learned already to these instruments. Next year, I can see this being a tool I use to encourage the students to discover some of the concepts we study on their own without my input! Of course, I also think that their collaboration skills and ability to persevere will be tested by this kit.
To create a project that I could easily use with my students, I went through the following steps:
Gather small metal objects. Of course, you could also use bananas or other fruit, but in a school I don’t see that as a practical option; paperclips, however, are abundant and cheap!
Connect the objects to the circuit board with the alligator clips.
3. Connect the alligator clips to the circuit board.
4. Plug in the USB cable from the circuit board to your computer.
6. Hold the alligator clip that is attached to the “Earth” part of your circuit board in one hand and start tapping your metal objects to make music!
I was inspired by last week’s work to create a bit of a remix to summarize the work I did while exploring the MakeyMakey kit. I, of course, included an example of the lesson I outlined above, but I also wanted to connect it to the “Failure to Success” video of last week by showing a few of my fails. I also wanted to include some of the ideas and thoughts that came to mind as I was exploring. Check out the video below!
*The addition of the pictures and videos helps to illustrate ideas that may not have come across with just words. As people go through a post, having images and videos helps to clear up misconceptions and also makes it a lot more interesting to read!
As I began learning more about the maker movement, Carol Dweck’s TED Talk about the power of believing in the “Power of Yet” came to my mind instantly. Ever since I watched that TED Talk, I have used the line “you’re just not there yet” with my students constantly. I work hard to instill the idea that they will make mistakes, they will encounter challenges, they will be frustrated, and that is all okay! Mistakes mean we’re learning! This idea of overcoming struggles until you succeed is perfectly demonstrated in the maker movement. Allowing children the opportunity to be creative and make things is one of the most authentic ways to teach them problem solving and perseverance.
My next thoughts were focused on time. I am willing to bet that most teachers struggle to fit everything they want to do into the school day. With each new and unique instructional idea, one of the first things we ask ourselves is “When?” I decided to back up and think about what my students would get out of the opportunity to explore and create. The list was long, but I narrowed it down to how their character would be positively impacted. Our school focuses on four character traits as a part of our character education program: respect, integrity, responsibility, and perseverance. When I think of a child sitting down for “Maker Time”, I can see them learning a lot about being responsible with their time and materials, being respectful of other kids’ ideas and failures, showing integrity by focusing on doing their best work, and, of course, they would have to learn to persevere. As I was creating a remix to represent the idea that our failures lead to our successes, I was challenged, frustrated, and engaged. Although there were times I wanted to call it quits, I also found myself being motivated by the challenge. It was engaging to learn a new skill and solve problems. This activity showed me the importance of putting our students in that same type of situation. They need to learn how to fail in a safe environment so they know how to react in every day life. The kids are so used to being set up for success all the time and getting a prize whenever they win a game that many of them have no idea how to fail, problem-solve, and try, try again. These skills and lessons are so important for the kids to learn that it is hard to not justify the time to allow these kids to experience the success and failure that the maker movement brings.
Check out the remix video I created below. It is certainly not perfect and I do think I have a lot to learn, but I enjoyed the journey getting to this end product.
The last seven weeks have gone by so quickly! I can’t believe it is time to sit down and reflect on what I have learned.
One of the biggest take aways I have from this class is the newfound understanding I have gained of the TPACK framework. I have learned how critical it is to think about the TPACK framework when designing instruction for my students. I will continue to explore options with the TPACK framework in mind that are appropriate for my young learners and that spark their creativity and interests. Dr. Mishra’s lecture was definitely one of my favorite parts of this course because he helped me understand that there really is no such thing as “Educational Technology”, but instead it is technology in the hands of innovating educators. I found that idea to be freeing and inspirational. I am now more excited about looking at various technologies in a different way and working to repurpose them for use in my classroom.
As I take this new learning with me to my classroom, I still wonder how to communicate this learning to other educators who may be resistant to the new changes that education is and will continue to experience. I also think about the amount of time it takes to not only redesign units and lessons, but then to teach the technology to my young ones and also ensure that they walk away having learned the main lesson objectives. I think what has helped me wrap my head around all of this is that I don’t have to redesign lessons all at once. I can instead take smaller steps to innovate with technology when it fits in with my students’ needs and interests. I also have enjoyed building and reflecting on my Professional Learning Network. I am also still trying to wrap my head around RSS feeds and I am interested in exploring it further to see if it is something that will help me to organize the information I am interested in from other websites. By continuing to build a strong online network, I can take advantage of the ideas of other educators and tweak them to fit my needs. I am also more aware of the need for me to give back to my network and share the ideas I am coming up with in my classroom!
For this week’s activity, I was asked to complete a cooking task using only three randomly selected kitchen tools. Without knowing what I would have to do with the kitchen tools, my fiancé gave me a small plate, a bowl, and a wooden spoon. After drawing a number from a bag, I was matched with my cooking task: make a veggie tray. I was understandably skeptical about being able to complete this task without demolishing the green pepper I had. A wooden spoon probably would’ve been my last choice of utensil for this type of task. While I wouldn’t take that veggie tray to a party, it ended up getting the job done. Now, at this point you are probably wondering why I am doing a cooking challenge for my Master’s of Educational Technology course, but this activity actually brought to life the idea that educators are constantly repurposing technologies for use in the classroom.
Keeping the Technological Pedagogical Content (TPACK) framework in the forefront of our minds as we plan for our instruction will help us to design the most effective lessons for our students. We won’t always be using technology in the way that it was originally intended to be used, in fact, we hardly ever do that! We were introduced to this idea that there is no such thing as “Educational Technology”, but instead we really have technology in the hands of educators who are repurposing it to take student learning to the next level.
Take a look at the video below to see how I was able to repurpose a tool to complete a cooking task!


